Computers were supposed to relieve us humans from boring and repetitive jobs. Here we turn this upside down and do the boring and repetitive job of a computer by importing Cloudflare DNS records to Terraform ourselves. Not fun, but someone’s gotta do it sometimes. If you’re reading this, that someone is probably you. Condolences. My hope is that someone lazy enough gets bored enough to write a program to do this. I didn’t. Yet.
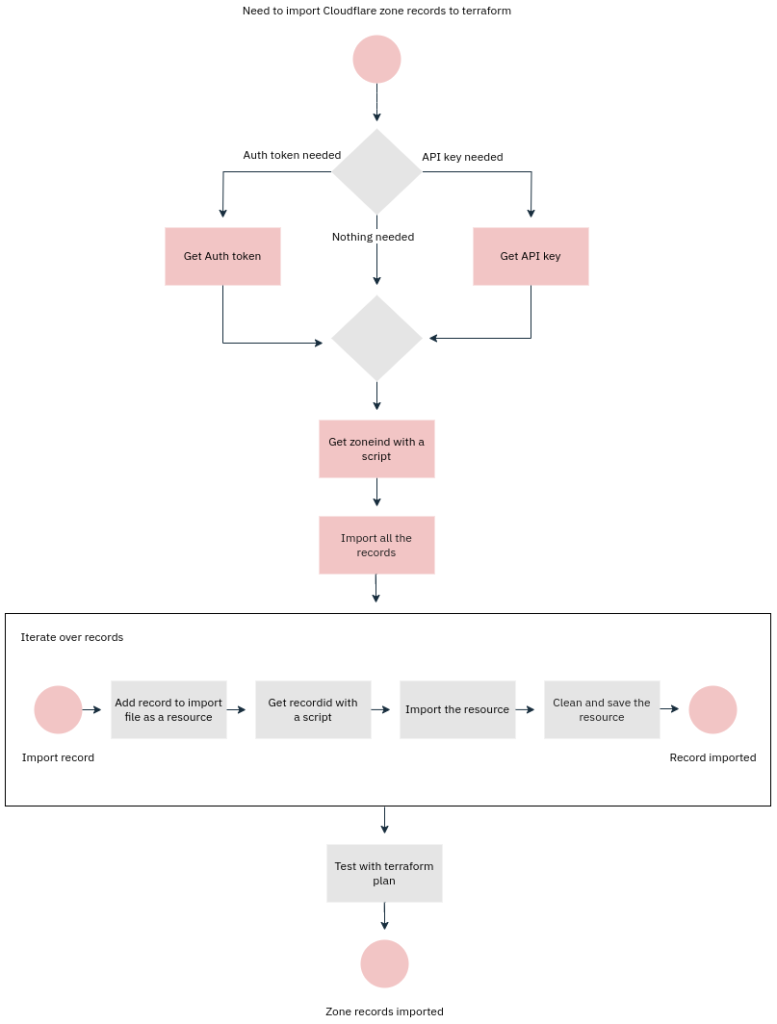
To import a DNS record to terraform, you need to create yourself a Cloudflare API token and (to make this a bit less awful), also an API auth key. They can be created or obtained from your Cloudflare profile. Check Cloudflare documentation for more info.
The generic form of importing a record from Cloudflare is:
$ terraform import cloudflare_record.default <zoneid>/<recordid>Now where do you get the zoneid? Here’s one way by using their API (you obviously need curl and jq):
#!/bin/bash

if [ $# -ne 0 ]; then
    echo "usage: $(basename $0)"
    exit 1
fi

BASURL="https://api.cloudflare.com/client/v4/zones"
QUERY="?name=${NAME}"
EMAIL=”[email protected]”
AUTHKEY=”yourapiauthkey”

zones=$(curl -s -X GET "${BASURL}" \
  -H "X-Auth-Email: ${EMAIL}" \
  -H "X-Auth-Key: ${AUTHKEY}" \
  -H "Content-Type: application/json" | jq '.result[].name' | tr -d '"')

for zone in $zones; do

  echo -n "$zone: "

  id=$(curl -s -X GET "${BASURL}?name=${zone}" \
  -H "X-Auth-Email: ${EMAIL}" \
  -H "X-Auth-Key: ${AUTHKEY}" \
  -H "Content-Type: application/json" | jq '.result[].id')

  echo $id

done
Fill the obvious missing information, save it and run it. That will list all your Cloudflare zones and their ids.
To get an id of an existing record in Cloudflare:
#!/bin/bash

if [ $# -ne 2 ]; then
    echo "usage: $(basename $0) recordname type"
    exit 1
else
    NAME=$1
    TYPE=$2
fi

BASURL="https://api.cloudflare.com/client/v4/zones"
ZONEID=”yourzoneid”
QUERY="?name=${NAME}&type=${TYPE}"
EMAIL="[email protected]”
AUTHKEY=”yourapiauthkey”

curl -s -X GET "${BASURL}/${ZONEID}/dns_records${QUERY}" \
     -H "X-Auth-Email: ${EMAIL}" \
     -H "X-Auth-Key: ${AUTHKEY}" \
     -H "Content-Type: application/json" | jq '.result[] | .id'
Name the script like get_recordid and use it by specifying a name and a type, like this:
$ ./get_recordid www.example.com AHere we assume the record is ”www.example.com”. Now, to import a record:
- lookup the name in Cloudflare portal
- Lookup the id of the record with the above script
- Create a file named import.tf with a content of:
resource "cloudflare_record" "www" {}And do the import:
$ terraform import cloudflare_record.www <zoneid>/<recordid>If you didn’t screw up, the record is now in your terraform state, hopefully a remote state. To show the contents of the resource:
$ terraform state show cloudflare_record.wwwCopy the content to your preferred file and carve off extra fat to make it look like:
resource "cloudflare_record" "www" {
  name    = "www"
  proxied = true
  type    = "A"
  value   = ”127.0.0.1
  zone_id = cloudflare_zone.yourzone.id
}
Remove the initial resource from import.tf. You should now have it properly imported.
$ terraform plan Should not want to make any changes. That’s it. Repeat for every record like a good computer. Have "fun".
If you're of the type that sees things as processes, here's one for you: