
What does it do, this Keycloak thing?
Dear seasoned keycloaker, as you probably know, Keycloak is a stable, scalable, programmable and otherwise killer platform to centralize all your identity, authentication and authorization needs. Keycloak supports fine-grained authorization policies using Keycloak authorization services. We highly recommend reading our Keycloak authorization services terminology article before this article. if you don't understand terms, you will have some hard times ahead. The purpose of this article is to give you an example of how to work with the Keycloak authorization services REST API.
To be perfectly honest, there is no separate Keycloak authorization services REST API: instead, it is the same old Keycloak Admin REST API. The payloads and paths for the authorization services have been documented in our Keycloak Authorization Services REST API: paths and payloads article.
Commercial support from Red Hat?
If you are on the business side of things and worry about support, continuity, standardization, compliance, SLAs and stuff (you should), Red Hat Single Sign-on is the supported version of Keycloak. Unfortunately Keycloak is not available as a standalone product and you need to get it as part of Red Hat Runtimes or Red Hat OpenShift Container Platform subscription. For further details, contact us or Red Hat.
What is Keycloak good for?
Keycloak supports standard protocols such as:
- OpenID Connect
- OAuth 2.0
- SAML
- Kerberos
You might use it for:
- Single-Sign On with OTP/MFA and all WebAuthn goodies
- Centralized management of identities
- Identity brokering - authenticate with other OpenID Connect or SAML 2.0 Identity Providers
- User federation (using already existing identities from backends like Active Directory or Red Hat Identity Management server or LDAP)
- Authentication and authorization for your Uber awesome hit application with unreasonable requirements in a scalable and standards-based way, while still maintaining your sanity
- Use fine-grained authorization and UMA for your awesome new business idea that requires users to give permissions to other users.
- Centrally protect your precious APIs
- Some esoteric and original purposes
With all the features and power, comes the cost of complexity, but it has real design to keep this complexity in shape. Keycloak has a pretty WebUI (at least the latest versions) to make you handle tasks that are suitable for a human with ease.
Assuming things
Every technical blog will be obsolete tomorrow. Without specifying what is assumed, people might waste their precious time and feel bad. We're nice and happy people, we don't want that. Therefore we assume that:
- You have some basic understanding of REST in general
- You paid some attention in your Ruby class
- You like (or don't hate) object oriented approach to things
- You have a test Keycloak instance somewere around you. We tend to use the Vagrant setup from puppet-module-keycloak.
- Your Keycloak version is 15.0.2
- You know your ways with Tcpdump or Wireshark
- You use Emacs as your operating environment. Nah, just kidding. Just use that vscode.
From clicking to code
For things that we humans would really not like perform, usually repetitive tasks, they invented programming languages and REST APIs. Some then went farther and used programming languages to invent infrastructure as code tools to maintain a desired state for all your fleet, and some, ahem, then automate all kinds of things with those tools (Terraform, Ansible, Puppet anyone?) Talking to the API with a programming language, however, is what we will cover here. If you are the infamous clicking operator in your company, and actually enjoy your work, perhaps this is not for you.
The language we use here is Ruby, and the gems we need are HTTParty and json. Ruby is a pretty language and I like pretty languages. The goal is to add a new permission, a scope-based permission to be precise, to already existing shared resources. As noted, this is not very enjoyable with thousands of resources in the WebUI, unless you took overdose of steroids and built inhuman clicking muscles, or learned how to do RPA as an ugly workaround. Yes, we can also do robot for you, if you absolutely require. However Keycloak is all about APIs, so let's leave them UIs alone.
Set things up for Keycloak authorization services REST API
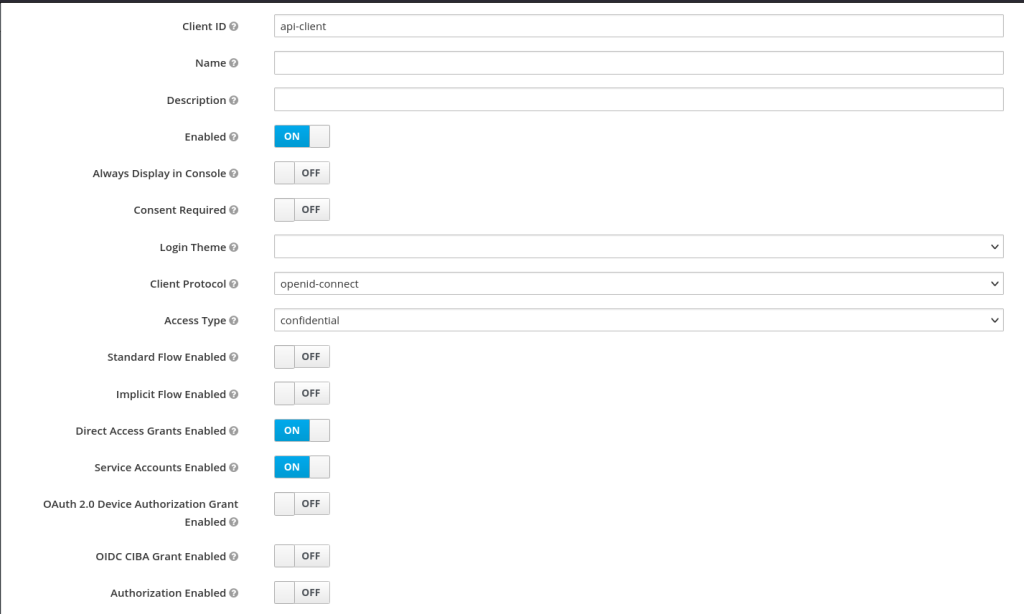
First we need to prepare to talk to the Keycloak authorization services REST API. In your master realm create a new client. Here we call it "api-client" but it can have any name you want. Here are the essential settings:
- Name: api-client
- Access type: confidential
- Service Accounts Enabled: true
- Scope: Assigned Roles -> admin
- Service Account Roles: Assigned Roles -> admin
Here's a walkthrough of the client settings. The new client's "Settings" tab should look like this:
Then under Credentials tab, set Client authenticator to Client id and secret and copy the Secret:

The next step is to allow this new client to do things with the Keycloak Admin REST API. First ensure that its Service Account Roles include the "admin" realm role:
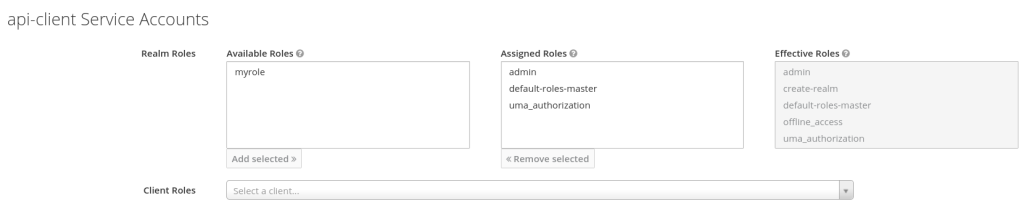
A Service Account is essentially a hidden Keycloak user linked with a client that allows a client to have permissions without requiring a real user login first. The next step is to ensure that the "admin" role is also listed in the Scopes of the client itself:
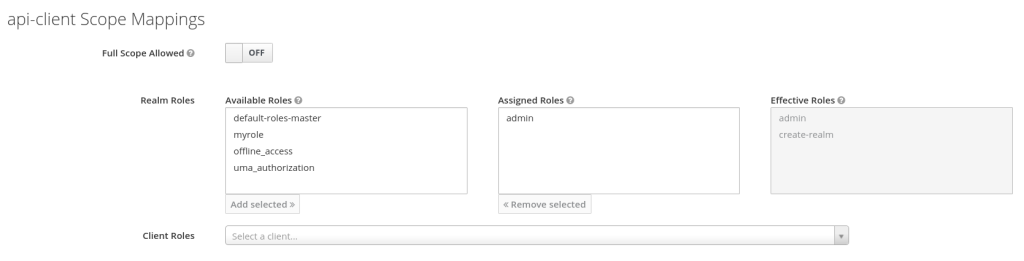
Now both the user (i.e. a service account) and the client have "admin" level permissions. This means that the token your script receives from Keycloak's token endpoint will have enough privileges to do operations against the Admin REST API.
You could probably add this custom client to a non-master realm, but you'd need to copy the "admin" and "create-realm" realm roles from the master realm there first.
Payloads
Let's do some Keycloak authorization services REST API
Some class action
Ok, now for the code. Let get our class started:
#!/usr/bin/env ruby

require 'httparty'
require 'json'
require './config'

class KeycloakClient
  include HTTParty

  attr_accessor :token
This is pretty obvious: we get the configuration values by using a Config class from the file config.rb. That class reads the values from an ini-style file, that we initialize it with.
Let's initialize
First let’s initialize the wanna-be instance with the server and authentication details, and get a token. Using an inifile makes it easy to DRY and switch between instances:
def initialize(server_url, grant_type, client_id, client_secret)
    @server_url = server_url
    @auth = { grant_type: grant_type, client_id: client_id, client_secret: client_secret }
    @token = get_token
  end
Everyone needs a token
Here’s the method to obtain and store the token:
def get_token
    response = self.class.post("#{@server_url}/auth/realms/master/protocol/openid-connect/token",
                               body: {
                                 grant_type: @auth[:grant_type],
                                 client_id: @auth[:client_id],
                                 client_secret: @auth[:client_secret]
                               },
                                 headers: { 'Content-Type' => 'application/x-www-form-urlencoded' })
    response.parsed_response['access_token']
  end
Now, what do we actually need to do?
Getting a token is nice, but not very interesting. For meaningful operations, we need to do a couple of things:
- Convert our target client name to an internal id
- Search and get list of existing resources on the client based on type
- Retrieve the hash of the scope that we want to add to the resources
- Retrieve a resource hash based on name
- Update the current resources
What's the client's id?
After instantiating the class and having gotten the token, we need the target client id, where the resources are located. Here’s a method to get that based on it’s name:
 def get_client_id_by_name(realm, client_name)
    response = HTTParty.get("#{@server_url}/auth/admin/realms/#{realm}/clients",
                              headers: { 'Authorization' => "Bearer #{@token}" })
    client = JSON.parse(response.body).find { |c| c["clientId"] == client_name }
    return client["id"] if client
  end
What are the existing resources?
With this method, we build an array of our existing resources of certain type (type is a completely arbitrary string).
# returns array
  def find_by_type(array, type)
     value = array.select { |hash| hash["type"] == type }
   end

# returns array
   def get_resources_by_type(realm, client_id, type)
     response = HTTParty.get("#{@server_url}/auth/admin/realms/#{realm}/clients/#{client_id}/authz/resource-server/resource?deep=false&first=0&max=1000",
                             headers: { 'Authorization' => "Bearer #{@token}" })
     matches = find_by_type(response.parsed_response, type)
   end
What does the scope look like as a hash?
For building the final payload, we need to retrieve the new scope as a hash:
# returns hash
  def get_scope_hash_by_name(realm, client_id, scope_name)
    response = HTTParty.get("#{@server_url}/auth/admin/realms/#{realm}/clients/#{client_id}/authz/resource-server/scope?deep=false&first=0&max=1000",
                              headers: { 'Authorization' => "Bearer #{@token}" })
    name = JSON.parse(response.body).find { |c| c['name'] == scope_name }
    return name if name
  end
How do I feed the server?
And finally we need a method to actually shoot our payload. This is also where the class ends.
def update_resource(realm, client_id, payload, resource_id)
    response = HTTParty.put("#{@server_url}/auth/admin/realms/#{realm}/clients/#{client_id}/authz/resource-server/resource/#{resource_id}",
                            headers: {
                              "Authorization" => "Bearer #{@token}",
                              "Content-Type" => "application/json"
                            },
                            body: payload.to_json
                           )
  end
end # class ends
Where to get the parameters?
To use these methods, some parameters need to be to initialized. As mentioned, I use a config class that gets it values from an ini file
config = Config.new(’./config.ini')
realm = config.keycloak_target_realm
client_name = config.keycloak_target_client
server_url = config.keycloak_server_url
username = config.keycloak_username
password = config.keycloak_password
grant_type = config.keycloak_grant_type
client_id =  config.keycloak_client_id
client_secret = config.keycloak_client_secret
target_resource_type = config.keycloak_target_resource_type
new_scope_name = config.keycloak_new_scope_name
Create a new client instance
After these we create a shiny new instance:
client = KeycloakClient.new(server_url, grant_type, client_id, client_secret)Talk to the right client
Get the target client id:
target_client_id = client.get_client_id_by_name(realm, client_name)Collect the existing resources
Build an array of existing resources that match the type you want:
resources = client.get_resources_by_type(realm, target_client_id, type))What does the scope look like as a hash?
Get the new scope as a hash:
new_scope_hash = client.get_scope_hash_by_name(realm, target_client_id, new_scope_name)Feeding time
Now we can finally do some real work.
We iterate over our existing shared resources and build an acceptable payload. Then load it to the server. This payload will associate the new scope with the resources of the type you wanted:
resources.each do |resource|
  payload = {}
  resource_name = resource['name']
  h = client.get_resource_hash_by_name(realm, target_client_id, resource_name)
  if h.has_key?('scopes') and h['scopes'].any? { |e| e['name'] == new_scope_name }
    puts("resource '#{resource['name']}' already has the scope '#{new_scope_name}', skipping...")
    next
  end
  payload['name'] = h['name']
  payload['type'] = h['type']
  payload['owner'] = h['owner']
  payload['ownerManagedAccess'] = h['ownerManagedAccess']
  payload['displayName'] = h['displayName']
  payload['_id'] = h['_id']
  payload['uris'] = h['uris']
  current_scopes = h['scopes'] || []
  updated_scopes = current_scopes + [new_scope_hash]
  payload['scopes'] = updated_scopes
  print("updating resource '#{resource_name}'...")
  response = client.update_resource(realm, target_client_id, payload, h['_id'])
  if response.code == 200 || response.code == 201 || response.code == 204
    puts "ok"
  else
    puts "failed, got #{response.message}"
  end
end
Good luck!
Run it and (hopefully) enjoy your new scope-based permission to further authorize your resources (or theirs, with UMA). Of course you can improve from here. This was meant to be a short demonstration of how to use the Keycloak authorization services REST API to manage keycloak authorization resources. There are many other ways to use Keycloak APIs for all kinds of things, perhaps to build killer puppet types and providers, Ansible modules, or Terraform providers. That’s what we pretty much do here: automate anything that moves and make stuff behave, for fun and profit.
The methods here are mostly a result of tcpdumping the WebUI traffic and experimenting. The documentation does not always cover all the necessary things. I’m sure there are other, perhaps funnier and/or more elegant ways to do this. If you know about cool Keycloak stuff, tell us, if you don't, don't. The following might be useful with your RESTing practices with Keycloak. What it does is shamelessly left as an internet search exercise for the reader:
tcpdump -vvv -ni lo port 8080 and 'tcp[((tcp[12:1] & 0xf0) >> 2):4] = 0x50555420' or 'tcp[((tcp[12:1] & 0xf0) >> 2):4] = 0x504F5354'