Grafana is a common tool to visualize data from multiple datasources. Perhaps the most common datasource is Prometheus. If an organization has a Single-Sign On solution, it makes sense to authenticate users centrally with that solution That will make authentication easier and friendlier for end users (authenticate once and then access multiple services), and also enable stronger authentication by adding multifactor authentication.
In addition to authenticating user, it is also possible to authorize Grafana users based on their group membership.
Grafana supports three organizational roles for authorization :
- Admin
- Can add, edit, and delete data sources.
- Can add and edit users and teams in their organization.
- Can add, edit, and delete folders containing dashboards for data sources associated with their organization.
- Can configure app plugins and organization settings.
- Can do everything allowed by the Editor role
- Editor
- Can view, add, and edit dashboards, panels, and alert rules in dashboards they have access to. This can be disabled on specific folders and dashboards.
- Can create, update, or delete playlists.
- Can access Explore.
- Can add, edit, or delete alert notification channels.
- Cannot add, edit, or delete data sources.
- Cannot manage other organizations, users, and teams.
- Viewer
- Can view any dashboard they have access to. This can be disabled on specific folders and dashboards.
- Cannot add, edit, or delete data sources.
- Cannot add, edit, or delete dashboards or panels.
- Cannot create, update, or delete playlists.
- Cannot add, edit, or delete alert notification channels.
- Cannot access Explore.
- Cannot manage other organizations, users, and teams.
Here we will use the excellent Keycloak identity and access management solution to centrally authenticate and authorize users using Single-Sign on.
Assumptions
- Keycloak is already up and functioning. If you are serious about this, you are running it in highly available clustered or domain mode
- The Grafana node is already up and functioning
- We will be using Oauth2 protocol
- For the user federation provider we will use the excellent FreeIPA. Other providers, like Active Directory work in a similar way.
- We will use a slightly more advanced way to map some FreeIPA groups to Grafana roles. This is convenient way to centrally authorize who can do what in Grafana. This same technique would also work for other providers.
- The keycloak url is https://keycloak.example.com
- The Grafana url is https://grafana.example.com
- You already have a realm in your Keycloak named YOURREALM
And now for the configuration. Configure a new client in Keycloak:
- Access Keycloak using credentials with appropriate permissions
- Create the grafana client:
- ID
- Name (Optional)
- Client Protocol: opened-connect
- root url: <the url of the grafana url>
- Access Type: confidential
- Standard flow enabled: ON
- Direct Access Grants Enabled: ON
- Root URL: ${authBaseUrl}
- Valid Redirect URIs: <root url>/login/generic_oauth/*
- Base URL: /login/generic_oauth
- Clear Admin URL and Web Origins
Go to Credentials and copy the secret. You'll need it later.
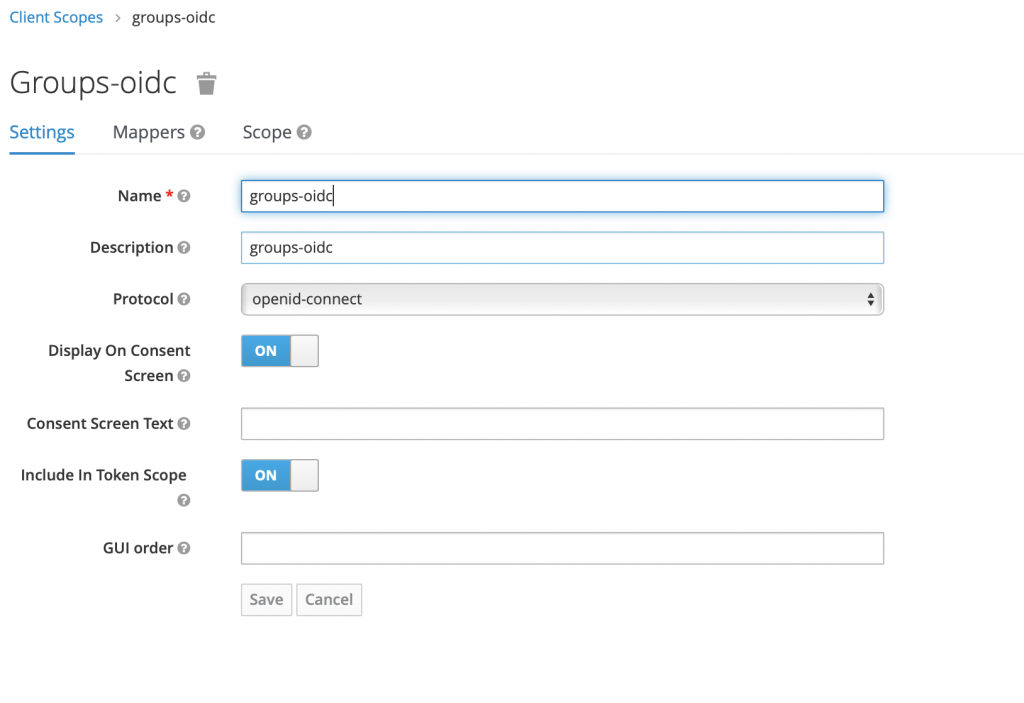
Go to Client Scopes and create a new client scope 'groups-oidc':
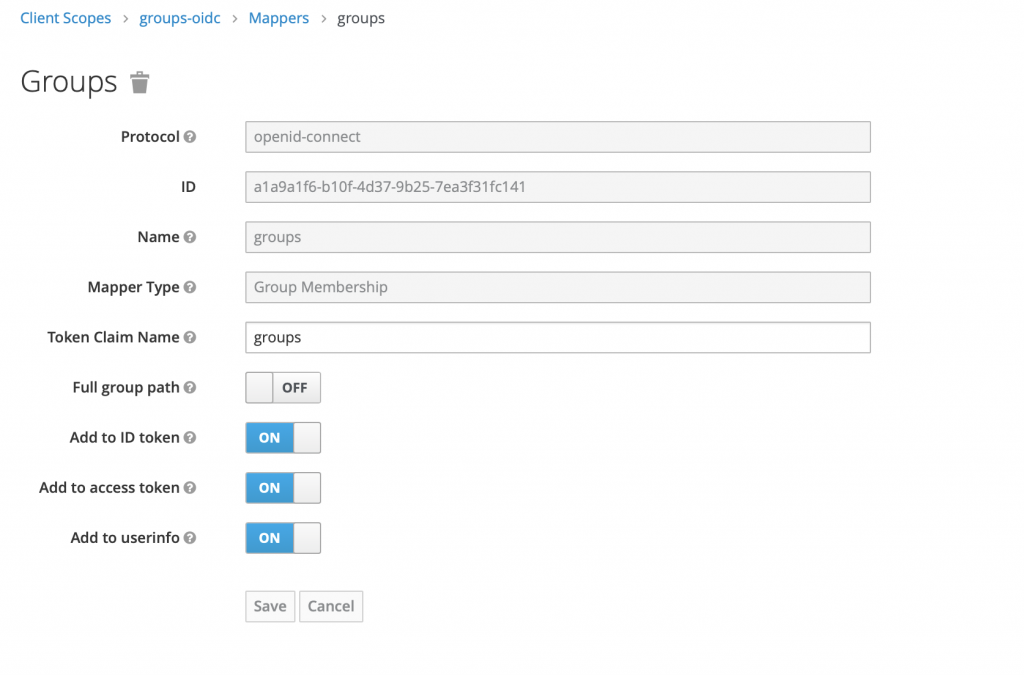
Create a mapper of type 'Group Membership'
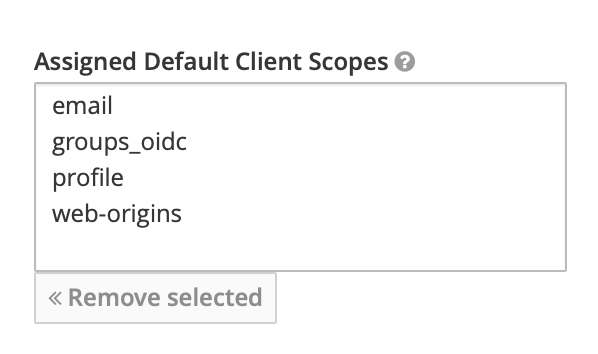
Associate new client scope with your new client in Clients -> Your client -> Client scopes. Add 'groups-oidc' to Assigned Default Client scopes
Access your FreeIPA and create new groups for mapping into Grafana roles (you can of course use some existing ones):
- grafana_admins
- grafana_editors
Add your users to these groups as member based to their required permissions. Note that users not in these groups will be authorized as Viewers.
Access your grafana and edit your grafana.ini. For auth.generic_oauth section specify this:
[auth.generic_oauth]
allow_sign_up = true
api_url = https://keycloak.example.com/auth/realms/YOURREALM/protocol/openid-connect/userinfoauth_url = https://keycloak.exampe.com/auth/realms/YOURREALM/protocol/openid-connect/auth
client_id = grafana.example.comclient_secret = <your-client-secret>
disable_login_form = true
email_attribute_path = email
enabled = true
login_attribute_path = uid
name = Example SSO
name_attribute_path = uid
role_attribute_path = contains(groups[*], 'grafana_admins') && 'Admin' || contains(groups[*], 'grafana_editors') && 'Editor' || 'Viewer'
scopes = openid email profile
tls_skip_verify_insecure = false
token_url = https://keycloak.example.com/auth/realms/YOURREALM/protocol/openid-connect/token
The most important thing to notice here is that we have altered the JMESPath expression to look for groups in the token:
role_attribute_path = contains(groups[*], 'grafana_admins') && 'Admin' || contains(groups[*], 'grafana_editors') && 'Editor' || 'Viewer'If configured correctly, Keycloak will provide these groups in the token.
Test the JWT token with your own username & password using the below shell script. Make sure you set Direct Access Grants Enabled to ON in your client settings, or this will not work. Also ensure that you have chrome JWT extension installed and jq available, and fill in the the right values for username, password, realm, client secret and client id.
#!/bin/sh
KEYCLOAK_USERNAME=<username>
KEYCLOAK_PASSWORD=<password>
KEYCLOAK_REALM=YOURREALM
KEYCLOAK_CLIENT_SECRET=<your client secret>
KEYCLOAK_CLIENT_ID=grafana.example.com
curl -s -v -k \
     -d "client_id=$KEYCLOAK_CLIENT_SECRET"" \
     -d "client_secret=$KEYCLOAK_CLIENT_SECRET" \
     -d "username=$KEYCLOAK_USERNAME" \
     -d "password=$KEYCLOAK_PASSWORD" \
     -d "grant_type=password" \
"https://keycloak.example.com/auth/realms/$KEYCLOAK_REALM/protocol/openid-connect/token" |  jq -r '.access_token'
Run the script, copy the token and paste it into JWT debugger. You should now see:
"groups": [
  "grafana_admins",
],
among other groups your user is a member of in your decoded payload. According to this group they will assume the role and their permissions in Grafana.
So this is a way to centrally both authenticate and authorize your users from FreeIPA using the awesome keycloak software. With slight modifications and testing you could make this work with other user federation providers, and even other IdPs. But really, why bother? We use these happily every day ourselves (also called eating our own dog food). This makes us better persons, although I'm not exactly sure how.
As always, we're both too busy and too lazy to configure these things by hand. Instead we set them up and ensure they stay up using Puppet automatization. This is also our modest contribution to ease the pain of our customers and make the world a slightly better place. If you too feel lazy or are too busy, let these modules do the hard lifting for you:
Or better yet, let us make them do the hard lifting for you. That's kind of, ahem, what we do. If you have questions or needs where we might be of help, don't hesitate to contact us. If you don't, well, contact us anyway and say hi.